
Teams is a flurry of activity: chats, meetings, file sharing, project planning. But flurries can turn to blizzards if you’re not careful. We’ve found that we’re more productive (and happier!) when we curate our notifications.
Here's what we like to do:
We like to think of Teams as our modern workspace. We wouldn’t clutter our physical workspaces with interesting-but-not-relevant updates from other groups, but it’s easy to let it happen in Teams. We get tagged in a chat or channel and then continue to follow the conversation long after it’s relevant to us just because it’s there.
When we curate our channels, we:
To change your settings for a chat or channel, select More options

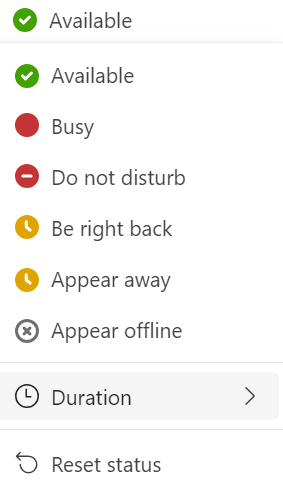
To change your status, go to your profile picture in the top right of the app and select one from the list.
Most of us are in and out of meetings and don’t have as much focused work time as we’d like (We’re sure no one can relate ;) ). We don’t want the little time we do have eaten up with quick questions and conversations that don’t require deep focus.
To let people know that it’s not a great time to reach out, we change our statuses to “busy” or “do not disturb." (Teams does this automatically when you're in meetings or sharing something, but you can set it yourself, too.)
You can also select Duration to set a fixed amount of time in the status you choose.
On our team, a "Busy" or "Do not disturb" status doesn't stop anyone from sending us a message, but it does shift expectations of how quickly they can expect a response.
The best way we’ve found to make sure we only get notifications we care about is to work our notification settings.
Choosing how and where you want to be notified for different types of things comes down to personal preference, so our team is all over the place. Some of us have every notification enabled and others none.
If you go to Settings and more > Settings > Notifications and activity, you'll see that there are a few categories for adjusting how Teams can notify you:
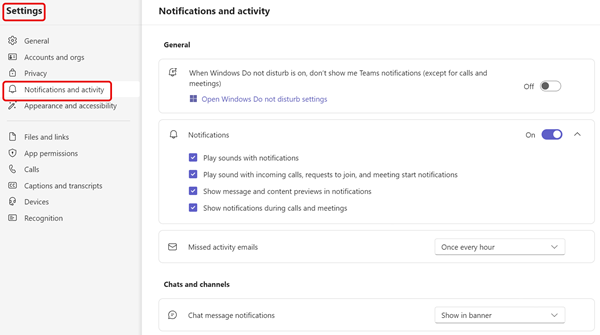
Teams has multiple options for managing notifications and activity across different features.
Most of us turn email notifications off since we spend most of our time in Teams and not much in email. If you spend more time in email, you might want to keep these on to make sure you know what's going on in your teams.
Most of us only use banner notifications for the things we want to know about right away, like when someone replies to us, @mentions us, or when meetings start.
Getting banner notifications for other stuff can get a little overwhelming with a big team. Take likes, for example. We're a friendly team and we often like messages to say "got it," so if we got banner notifications for every like someone tossed our way, we'd be tangled up in banners all day. But if your team uses likes differently, say as approvals, you might want to get banner notifications when someone likes your messages.
Some of us restrict our feeds to stuff we need to act on, like replies and @mentions, so we can use it as a to-do list. (If you're a list person, you might really like this, too.)
Others use this space to explore what our teams are up to, reacting to more urgent things in the moment and then taking a peek at things like suggested and trending activity when we have time.
For more on Teams notifications, check out Manage notifications in Teams.